Disclaimer: I wrote this from Bulgaria, based on my experience here. Different countries might have their specifics, but the generic process is more or less universal, as it’s just basics.
So you got your new EV. Congratulations, you will love it! I’m sure you’re as thrilled as I was when I got my new (old) iX3.
Of course, the very first step is to check your current range. I remember when I got my new PHEV, it had fuel for ~30 km, so I needed immediate refueling. Yes, the dealers in Bulgaria are cheap. So check your range. If it’s less than what you need, you may need to go to a charger ASAP. But for that later. Just don’t forget to check the initial range, OK?
First, a Map of the Chargers
In Bulgaria, we have an excellent network of fast and not-so-fast chargers you could use. Of course, most of them are paid. But when you need a charge, you don’t care that much for the cost, but for the speed.
To locate your nearest charger, you have two options:
First, if your car has navigation (90% of them do), you can check there. However, this is already an unreliable and old map unless your vendor releases monthly updates. If they do, give them kudos from me and let me know which is that vendor, except if it’s Tesla. However, this is the easiest and probably the most intuitive (at first) thing. But this won’t tell you other important things, so we go to the better choice:
Download and install PlugShare (Plugshare for iOS|Plugshare for Android). This is the first and easiest way to see the map of chargers.
Now that you have an EV, you must know what kind of charging ports it has. If you’re in Europe, a new EV will come with a Type 2 socket (for AC charging) and a CCS/SAE socket (for fast, DC charging). You will use the first one, usually at home, most probably during the night. The second one is for fast charging while traveling.
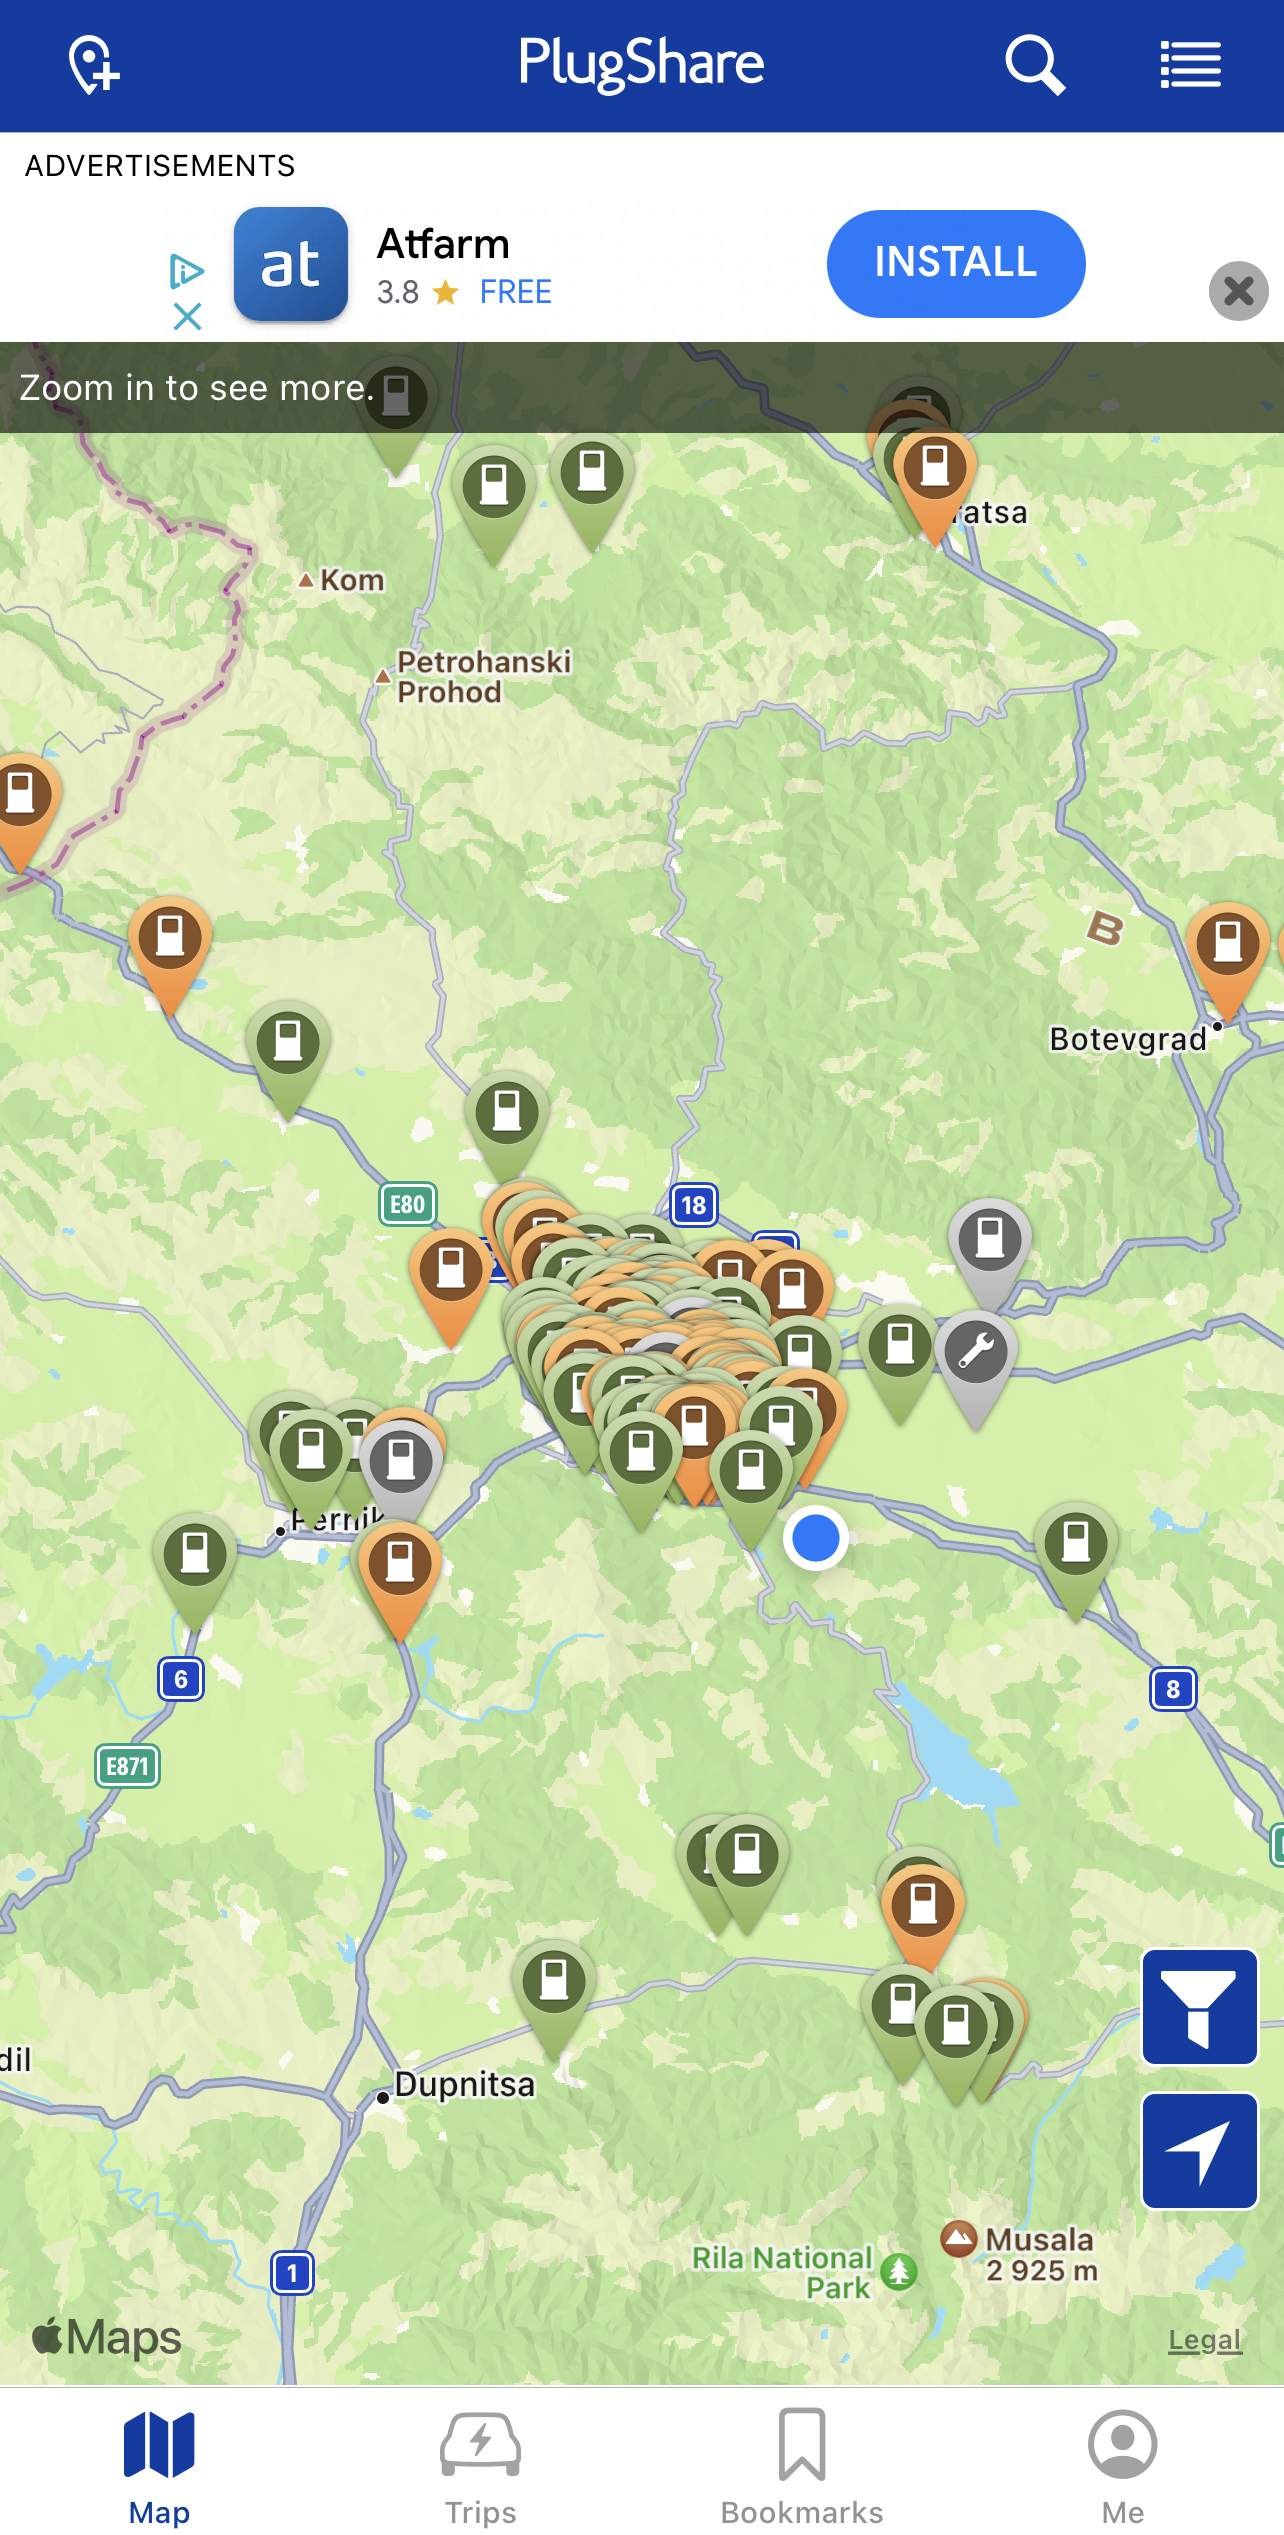
Plugshare (today’s version, probably it’ll evolve in time) map looks like the screenshot on the right.
The green stations are the Type 2 ones, AC charging, e.g., slow for long-distance travel. The orange stations are the most interesting ones. However, the green ones are suitable for a setup where you do not do home charging but rely on such stations, for example, while you’re shopping or going to the movies.
If your brand-new EV needs a quick charge, you pick up the nearest station and tap on it. You get info about the station. similar to what you see on the left.

- The location of the station. The most important thing is you need to travel there to use it. Tapping on “Get Direction” will let you choose which routing software to use (in my case Apple Maps, Google Maps, Waze, or copy the address). And then you can ask your navigation to take you there.
- The cost for your charging session. Fast charging is more expensive than slow charging and much more expensive than charging at home. You will use it only when on a long-distance voyage and need to add range quickly.
- Opening hours. Very important, as you will not be able to access the station if it’s closed.
- Description: usually has info on how many cables, what kind, and what maximum power. In this case, we have 2 CCS/SAE cables, 200 kW each. This is massive charging power. Bear in mind: your car may not be able to consume that much energy inflow. But DC charging is intelligent enough to give you up to the maximum energy, which your car is ready to charge at the given moment.
- The type of plug on the station is so important that it has an additional, dedicated mention: 1 station (with two plugs, as seen above) of type CCS/SAE. Please note the “Station detail” link right under the “5” number – we will talk about this later.
- Last but far not least: Comments! This is important too because it shows you the reliability of the station. Very often, these stations are self-operating, and there’s no personnel around. So the experience of our fellow EV colleagues is important. If a station is unreliable, people tend to put this in the comments.
As you can see, there’s more info, like “Amenities.” but this is not critical, or maybe it is, if you really, really need to go to No. 1 too.
In any case, the “Amenities” are important unless you prefer to spend 20-30 minutes charging in the car. Usually, when it’s just a one-time charge during a longer trip, it’s good to take a coffee or tea while waiting.
Adding charger apps
When you get a new electric car, you need to add the apps of the charging points. Usually, there’s more than one operator in each country. Sometimes operators spawn to nearby countries. For example, Ionity (unfortunately, not yet present in Bulgaria) covers many EU countries with one of the most powerful stations. But also it is very expensive.
You should sit with your Plugshare app and take a look at the various networks available in your country. For example, the most popular ones in Bulgaria are Fines and Eldrive. We also have EVpoint (which has primarily slower AC stations, but a lot of them) and EVN, which is one of the large electricity suppliers and is growing its network.
With a bit of browsing around, you can see which are the most popular networks in your country. Either use the filters or just browse the stations, which are on the most popular roads you expect to conquer with your BEV.
When you open the station info (see above), and tap on the “Station Details” button, you will get the list of the plugs in the given station, but also the “Network Info” link. In the example above, here’s what I get:


On the “Network Info,” you see the link. If you visit this link, you’ll go to the page of the operator, which will guide you to creating an account and adding a credit card to the account, and to downloading the app for your device, with which app you will start, stop, track progress, and pay for the charging.
I suggest you add all the most popular providers for your country and other countries of interest. This will guarantee you that you’re getting the best prices. Also, read through the conditions: sometimes you need to do something, and as a result, you may get an additional discount when charging.
If you haven’t noticed yet, you need a data link (2G/3G/4G/WiFi) to operate the station. The usual process to start your charging is as follows:
- Open the app of the Network, which operates the charger
- Connect your vehicle. Warning: some networks require you to authorize first and then connect the charger. Please read the instructions; you’ll get to know this in the future.
- Scan a QR code from the station (or select the station directly in the app)
- Press “Start charging” or whatever the app tells you to do to start charging.
Once charging starts, you can lock your car and go and get your rest. All apps I’ve seen so far offer you the ability to track down the charging progress directly in the app.
Please note: the charging speed depends on a few factors:
- Your car model: each car has charging limits for both AC and DC. For example, my iX3 has a 150 kW DC charging limit and an 11 kW AC charging limit. No matter how powerful the station is, I will never go above these numbers, as the car cannot take it.
- Your current State of Charge (SoC), e.g., how much is the battery charged already. The more the battery gets charged, the less its ability to suck power from the station. E.g., if you put your car to charge on DC when it’s at 10%, it’ll quickly go to the maximum, which either the station or the car allows. While your car gets more and more energy, the charging speed will decrease. It’s because of the laws of physics and the chemistry of the battery: we can’t do much to influence these numbers. Please remember that if you charge above 80%, the charging speed won’t be fast. So if you can afford it, charge always up to 80%, and then drive, and charge a bit on another station, when your SoC reaches again <30%.
- The conditioning of the battery: the battery has a temperature range that ensures maximum charging effectiveness (e.g., speed). Most cars will condition the battery while charging. Some cars also can precondition the battery while driving. In these cars, if you set the charging station as a destination in your car navigation, the car will automatically decide when to start preconditioning the battery for optimal charging so that when you arrive at the charger, your battery will be in the best possible condition to allow the fastest charging. Use that setting; it’s really good. The battery gets hotter while you drive, but depending on the weather, it might not be enough (or it might be too much). The preconditioning will save you time.
Home Charging
Now that I covered to some extent the “long-distance drive,” let’s finish with what a new e-car owner should have at home.
You can skip this part if you do not own a private parking spot for your car. You will not benefit to the maximum extent of e-car ownership, but it’ll still be much better than driving an ICE car.

If you own a private parking spot, it’s (almost) mandatory to install a home charging kit. I assume that your parking spot is internal, or at least it has a security box, which will protect the charging station from bad weather and people. The charging station is expensive equipment, so if, in order to protect it, you have to put it out each time you charge the car, you should do that. But it’s always better to have it secured in a box and outside the box to have only the Type-2 cable.
Charging stations vary! If you got one with your car, it probably wouldn’t work that well. It’ll be an average “standard Shuko connector” station so that it won’t draw more than 3.5 kW of energy from your outlet. Even 3.5kW ones could be too powerful for the “usual” home outlets: to use such power, you must ensure that your outlet is connected with a “good” cable and is of quality, which allows that much power drain.
If your outlet gets hot a lot (like uncomfortable on touch), you should probably reduce the power even more. If you don’t do that, and if your outlet is of bad quality, you’re risking destroying the socket of your station (it’ll just melt), putting you in danger of using it.

From a power outlet perspective, the best home solution is a 32A monophasic outlet, which can draw up to 7.5 kW of power. Such an outlet will require the following additional preparations.
First, you must ensure with your power delivery company that you have at least 15 kW available power for your home. You get additional appliances running at night (dishwasher, washing machine, etc.), and you must have enough power to supply them. Otherwise, you risk having your power cut by the automatic breaker. Usually, in Bulgaria, it’s pretty easy to confirm that, and in most cases, it’s very easy for the supplier to increase your power limit.
Second, you must remember that increasing the power limit might not work. You must ensure that you have wires that can deliver that power. In most cases, you will hire an electrician to perform all necessary tasks to install your 32A outlet.
Once the outlet is installed, it will resolve all your problems with charging your car from 10% to 100%. Today’s batteries are around 80-100 kWh, which means you can charge 75 kWh for 10 hours, and 90 kWh for 12 hours. Of course, your call will not often be at 10% or below. E.g., you can use only the much cheaper night tariff to charge your e-car.
In my case, charging 7.5 kWh is enough. But there’s an even stronger possibility: to charge at 11 kWh. In this case, you will need triphase power, which not every house has by default. If you live in a house and the power company has the wires, that should be easy (but it might be expensive). However, once supplied, you can use a triphase charger to reach 11 kW. And some cars can go even higher: I’ve heard about models which support 22 kW AC charging via Type-2. However, this seems like overkill for a home charging scenario. And I bet such a charging station will be quite expensive.
Once you decide on the maximum power, you should purchase a station that will satisfy your needs. I decided to go for a smart station, which I can control remotely with a phone app. It’s very handy: I set up the car to always accept a charge if the station supplies it, and I control the car’s charging via the app, which controls the station. That way, even if I decide to charge during the day, it just takes a few taps (if I connect the cable when I park, which I don’t always do).
My usage usually requires one to three charges per week, depending on the weather and my city travel. Yes, there are weeks when I do 200-300 km in the city. Thanks to the e-power, this comes at a very low cost. But such weeks are exceptional: my normal usage is around 150 km per work week. This means I charge each two-three days during the winter and every four to five days during the summer. My cable is always available outside, but the station is well-protected inside the house. One cannot detach the cable without destroying the station, so I feel pretty safe from petty theft there.
Conclusion
I know for sure two things:
- This article came way too long, but I hope you found some helpful info there
- I missed some helpful info and questions. If you have such, don’t hesitate to ask in the comments below.
Have fun e-driving! It’s great!